Thursday, April 21, 2016

Counter Chairs


Paint and fabric and dishes and furniture. Those are some of the things that can attract my attention in a heartbeat.

Mister used to warn the girls before he left for work not to stand still too long or "... mommy might paint you!" I was all about stenciling everything in the 80's and 90's. I often cajoled friends into painting a room (maybe a bit more daring color than they were ready for) by reminding them "it's just paint". At the time it was not hip or groovy to paint wood and to paint grandma's heirloom table would have been unforgivable. Fast forward to 2016 and everybody is painting everything!

I have shown you my fabric stash before. It is shameful. Over and over again I end up with a project that I could use one of my lovelies for but find I cannot part with it so I purchase something similar and keep my treasure tucked safe away for that "one day" project that will require My Precious and I know I will want to keep it forever. No, I am not on medication. Yes, I probably should be.

Dishes....I could have china hutches filled with Royal Doulton or pretty chintz tea cups, ceramic bowls and iron stone. My first stop in Home Goods is always the dishes. I ooh and aah and sometimes even come home with a piece or two...or more. Funny because my everyday dishes are white, I figure it safest so that I can add anything I want as an accent.

Then there is furniture and I have a cache of abused and abandoned pieces waiting in my basement for my attention. I intend to rework them, paint them and sell them in an attempt to keep funding my hunts for the other addictions. I have shared that Mister is not a fan of all that furniture in my basement but what you may not know is that sometimes he brings furniture home to me! Yes, he does!

Recently he brought home a pair of counter height bar stools. They are black metal with a pleather seat. I immediately put them up for sale on our local yard sale sites on Facebook at a reasonable price and got no interest. I dropped the price three times and didn't even get a nibble. By that last price drop I was asking 1/2 of what I had originally posted them for. I don't think I was being unreasonable in the pricing and was practically giving them away and still nobody wanted them. It was sad. So, what's a girl to do. I yanked them puppies from the sites, took the seats off and started painting!


I used Waverly's Chalk Paint in the color Agave. I purchased it at Walmart for $6 a while ago for another project. Each chair got two coats.


 I then sealed the paint with a spray coat of Rustoleum Crystal Clear Enamel.

Go figure, I have a blurry picture of the Crystal Clear Enamel. Sorry.
Had to wait for a nice day to spray coat them.
Why not just spray paint the color vs. chalk paint? I had that paint on hand!


Originally, I thought I would cover the seats in some of my fabric stash. I have a ecru colored canvas that I thought could work.


I intended to stencil something onto the material; a bee, a number, maybe just a couple stripes.... Naw! I ditched that idea and decided the chairs needed a fun fabric-something summery and playful.

Armed with a Joann Fabrics coupon and a vision I hit the road. I forgot to bring a paint sample with me so I was winging it. I returned with $5 worth of fabric that was spot on for the colors!


I left the pleather on and used the seat as my pattern. I cut a square about 3 inches wider than the seat so I had fabric to wrap under. Starting on opposite sides I stapled the fabric in place, pulling it smooth but not too tight. For stapling think 12 and 6 on a clock. Next I stapled at 3 and 9. Now smoothing the fabric in between the staples I kept moving along each time opposite the last one to keep the fabric smooth and taut. I trimmed the fabric to make it neat and reattached it to the frame.


And... here is the finished product.


In my kitchen, even though there is really no room for them here. 

Taken with my phone.Ugh! 
I had the paint, the chairs were free. It cost me a few dollars for fabric and hopefully, I will get the price I want for them now. I can just see them in someone's Cape Cod home or summer rental. What do you think?

Party Time!
The Curator's Collection, Imparting Grace, Lambert's Lately, My Repurposed Life, The Vintage Nest, Joyful Homemaking, Have a Daily Cup of Mrs. Olson, A Delightsome Life, Up To Date Interiors, Shabby Art Boutique, McCall Manor, In The New House, AKA Design, Life With Lorelai, Craftberry Bush, My Flagstaff Home, Must Love Home, The Pin Junkie, Shoestring Elegance, Craft Dictator, The Cottage Market, The DIY Village, A Tray Of Bliss, DIY Crush Party, Repurposing Junkie, French Country Cottage, Chic On A Shoestring, The Girl Creative, Blooming Homestead, Pieced Pastimes, Funky Junk Interiors, One More Time Events, Reasons To Skip the Housework, Finding Silver Pennies, Thoughts From Alice, Pink When, Nifty Thrifty Things, DIY Showoff, Create With Joy, My Pinterventures,  I Should Be Mopping The Floors, Plucky's Second Thought, Coastal Charm, Becoming Martha, Cedar Hill Farmhouse, Sand & Sisal, Cupcakes and Crinoline, A Stroll Thru Life, Elizabeth & Co, Our Home Away From Home, Cozy Little House, The Blissful Bee, Simply Designing, Gingersnap Crafts, DIY By Design, Handy Man Crafty Woman, Savvy Southern Style, The Dedicated House

Thursday, April 7, 2016

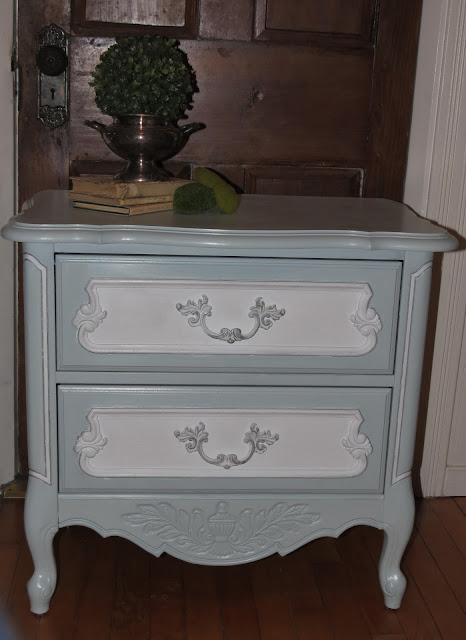
A Frenchy Craigslist Night Stand


About a year ago, maybe longer, I found a cute little frenchy kinda looking nightstand on Craigslist.


It was in rough shape and needed some TLC but for $12 (yes!) I could not pass it up. At the time my middle child was in a larger bedroom and I thought it would look nice in there or perhaps the younger one's bedroom if I did it up in pink and black. That was a year ago!

I brought it home and eventually it made its way to our field stone basement. Once things are banished to basement it is hard to bring them back. I have a hoard of mismatched, unloved furniture in the basement. Occasionally Mister will comment about my "sickness" but his patience goes only so far. He is wanting to do some work in the basement and that means that my stock pile of furniture projects will need to diminish-drastically!

I brought the little nightstand back upstairs and cleaned her off (and yes, with those cute little legs it has become a "she").

I mixed my favorite version of POP paint from some old paint I had used in the bathroom. The first coat was too blue.

The blue doesn't show well in this photo but it was too blue.
I cut it with some white paint left over from the trim color on our main floor.

The centers of the drawer faces got a coat of Waverly white chalk paint from Walmart.


I painted the side panel white but changed my mind as I went along.


I painted the handles in the same white chalk paint and hit them with silver Rub n' Buff that I used on the dining room mirror.


When the paint was thoroughly dry I tried some antiquing glaze but did not like the look, not for this piece so I painted over it. I tried the Rub n' Buff on the detail on the drawers but did not like that so I had to paint that part, again.

After it dried I used a silver paint pen to outline the drawer faces and side panels.


The whole thing got a coat of Annie Sloan's wax then was buffed for a nice finish.


Much has changed in my daughter's bedrooms since I bought the piece so neither on of them will be using her. Hopefully, I can find a nice family who will love her.


**UPDATE
I came a across a discarded mirror that had been in my youngest daughter's bedroom before her room was made over. Since I had some paint left over I decided to paint the mirror to match Frenchy. I sold them as a set!


Taken on my phone so a little blurry, sorry.
Party time!
Shabby Art Boutique, Up To Date Interiors, The Curator's Collection, Imparting Grace, Too Much Time On My Hands, Lambert's Lately, AKA Design, The Charm of Home, Craftberry Bush, Joyful Homemaking, Have A Cup Of Mrs.Olson, Must Love Home, The Pin Junkie, A Delightsome Life, A Vision To Remember, The Chelsea Project, French Country Cottage, Chic On A Shoestring, Craft Dictator, Just Us Four, The Cottage Market, DIY Vintage Chic, A Tray of Bliss, Pieced Pastimes One More Time Events, I Heart Naptime, The Girl Creative, Blooming Homestead, Sweet Things, Finding Silver Pennies,  Thoughts From Alice, Pink When, Nifty Thrifty Things, DIY Showoff, Blue Willow House, My Pinterventures, Coastal Charm, I Should Be Mopping The Floors, Creatively Living, Plucky's Second Thought, Create With Joy, Strangers and Pilgrims On Earth, Skip To My Lou, Newman's Corner, Cedar Hill Farmhouse, Sand & Sisal, Cupcakes and Crinoline, A Stroll Thru Life, A Bowl Full of Lemons, Our Home Away From Home, Cozy Little House, Elizabeth & Co, 20Something In The 2010s., Mummy Do ItThe DIY Dreamer, Kathe with an E, Savvy Southern Style, The Blissful Bee, Simply Designing, Gingersnap Crafts, DIY By Design, In The New House, McCall Manor, Handy Man Crafty Woman, The Dedicated House

Wednesday, March 30, 2016

Vintage Thymes Monthly Market Is Back!

Vintage Thymes Monthly Market had been a favorite shopping event for me. (You can find old posts about them under the Out & About button at the top.) I loved going and finding one of a kind items and at the very least I would leave with boat-load of photos for you and inspiration for my own home. Imagine my disappointment when they announced that they were loosing there "home" that had afford them the luxury of being opened for only one special weekend a month. They did open a fall market at a farm last October (see it here) and the day and setting were perfect but left them still with no permanent home.

About a month ago the happy news came that they had found a home and they were ready to start up their monthly markets again! (Insert happy dance here.) Robin and Nancy contacted me and asked me to let you all know....now we can all dance together! As I have been following their Facebook page I have become increasingly excited about the different vendors that will be contributing to April's market. There are some old friends like lovely Mary Ellen from 23rd and Bird 


23rd and Bird's old space in Norwood.


Fleurish Home and Garden
Fleurish Home & Garden

and  Carole from Fleurish Home and Garden and many new (or new to me) vendors  readying themselves and their treasures for the market. I can't wait to meet them.

From their official press release:

 "Vintage Thymes is a monthly antique market run by Westwood residents Robin Hanlon and Nancy Murphy.  The only market of it’s kind in the Metro South area, Vintage Thymes offers themed shows one weekend a month.  The markets feature a hip collection of vintage, shabby-chic furniture, garden and home décor, as well as treasures from Hanlon and Murphy who are known for their creative ability to breathe new life into tarnished and dusty vintage items."

Ooh!  So, with just a little over a week away I wanted to let all you know about it. Who couldn't use a little decorating inspiration, a trip out of the house and chance to shake off those winter cobwebs? Me, me, me and hopefully you, too! My camera and I will be there. Hope to see you there April 8,9 &10!

Vintage Thymes Monthly Market  500 Providence Hwy, Rt.1, Norwood, MA

Here are some examples of things you may find there:


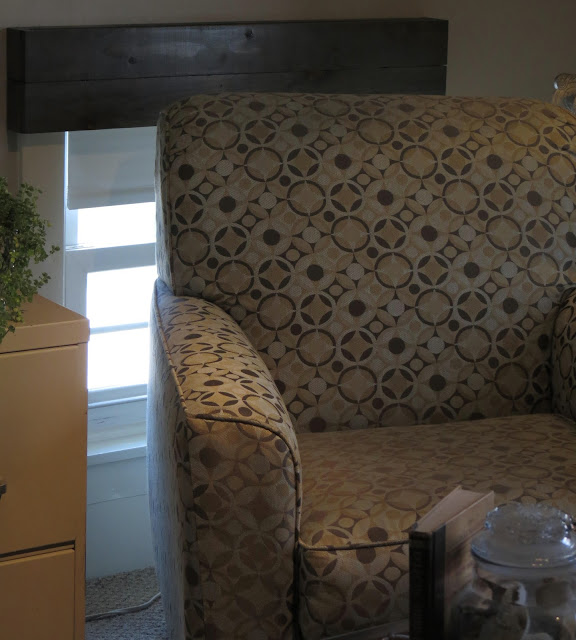
Wood Window Valances

Recently, we relocated and remodeled the office area in our home. You can read about it in these posts; Normalcy Office Reno in Progress and Done For Now Office Reveal  This is what the room looked like before:


We got the majority of the work out of the way and the room is functional and comfortable.


The windows had me stumped. I originally wanted wood blinds or some sort of bamboo or natural material for the texture and color. We had already purchased the standard white black-out shades and did not want to spend a ton on different blinds or shades.

I did not want to cover the entire windows in curtains. A valance of some sort seemed to be the obvious solution but I wanted it to add texture to the room. My solution was to build window boxes. I pitched the idea to Mister and he was on board. (Ha-ha, the pun was unintentional but I am leaving there for you!) It was going to cost a lot less than the other options which I am sure went a long way in convincing him.

The windows are 36 inches wide to the outside trim. We purchased six 1x4x4 boards. Each board was cut to 37 1/2 inches to allot for the the width of the wood and for the return.  That is 36" across the face of the window and 3/4" on each end for the return. (Did you know that 1" thick wood is really only 3/4"?) For the return we cut 3" pieces. We (meaning Mister) made 6 boxes like this.


Only 3 boxes got this treatment, they will be the headers, the other 3 will attach-1 each under the header
To keep the boxes square Mister ripped down 3 pieces of wood, 36" long, to sit at the back, this will also act as our hanger. We needed only three because the valances will be two boards deep, each. The bottom box does not need the hanger part.

Mister glued and used a nail gun with small brads to nail the pieces together. Immediately wipe any excess glue off as it will hinder your stain from doing its job.

One of the top pieces.


I didn't bother to heavily sand or fill holes-impatient!
Mister dry fit each valance top. Using a small drill bit he drilled through the hanger piece the hammered a nail into the top of the trim. This will hold the valance in place in lieu of L-brackets or hangers. Each window had two nails on the outer edges. And his job was done.


We numbered each board so we knew which window went with each board when all was said and done.

After the glue completely dried I went to work. I tested variations on staining techniques. The first was just a gray stain, the second was walnut stain then a layer of weathered gray, and the third was weathered gray then a layer of walnut stain.


We decided on the medium color. I stained each board with dark walnut stain I had left over from another project. After that dried I applied a coat of weathered gray. I did not bother to sand the boards first. I wanted it to look a bit weathered or beachy....and I am a lazy diy-er.


After the stained dried I applied a coat of polyurethane and allowed it to dry...sort of.


Time to assemble!

I took one top box; it has the ripped down wood keeping it square and has the holes drilled into it for hanging and one 2 sided box and lined them up using a penny at each end for a spacer. I wanted just a little space between the boards. I purchased 6 mending plates from Lowes and used self driving screws that were 5/8" long to be sure they did not pull through the front.


One in place....

And the rest and with that the office is officially, completely done....unless I think of something else to do in there.


Thanks for hanging in there with me on this one! Now, what's next?


Partying here;
McCall Manor, Up To Date Interiors, The Curator's Collection, Imparting Grace, Joyful Homemaking, A Cup of Mrs. Olson, Must Love Home, Shabby Art Boutique, AKA Designs, Too Much Time On My Hands, The Charm of Home, Craftberry Bush, Must Love Home, A Delightsome Life, Life with Lorelai, The Pin Junkie, Lambert's Lately, French Country Cottage, Chic On A Shoestring, Craft Dictator, Just Us Four, The Cottage Market, The DIY Village, DIY Vintage Chic, I Heart Naptime, Blooming Homestead, A Tray of Bliss, Pieced Pastimes, One More Time Events, Finding Silver Pennies, Nifty Thrifty Things, DIY Showoff, DwellingsThe Heart of Your Home, Thoughts From Alice, Pink When, Create With Joy, My Pinterventures, Plucky's Second Thought, Coastal Charm, I should Be Mopping the Floor, Skip to My Lou, Sand & Sisal, Creatively Living, Mad In Crafts, Cedar Hill Farmhouse, Flamingo Toes, Strangers and Pilgrims on Earth, The Dedicated House, A Stroll Through Life, Elizabeth & Co, A Bowl Full Of Lemons, Our Home Away From Home, Cozy Little House, Savvy Southern Style, The Blissful Bee, The Newlywed Pilgrimage,SimplyDesigning, Gingersnap Crafts, DIY By Design, Handy Man Crafty Woman,