Wednesday, August 23, 2023

Beach House 2023

Hello! 

Are you surprised it didn't take me nine months to follow up the last post? Me, too! 

Per the last post, I have been working on a friend's "new" beach house and while it was new to her it was not new in the truest sense. It needed a bit of a pick me up and I had no problem jumping in the second that she asked! 

Any reason to be by the ocean-even if it is "work" is a good enough incentive for me. 

Ready?

Let's go! 


This is the Beach Hive! The family has five children, all with names beginning with the letter B. You will see some subtle nods to bees as you scroll through the photos. 


This was once a long, dark hallway with no natural light.


That's a little blurry but you see where we opened it up. 


Notice the bee door knocker? 

The entry way had a washer and dryer behind folding doors. We had them removed and reworked the area, had a smaller closet built with a regular door and put in a stackable laundry unit. 
The extra space allowed us to build in a bench and hook area; a mudroom of sorts to store beach towels, purses, bookbags and shoes upon entering the house. 


 I love the board and batten. Keep scrolling...It is not the only place we used this treatment in the house. The whale tail hooks were a great find by the owners! 

I did not get any before pictures of the downstairs bathroom when it was in tact. There was 12x12 blue tile with this paint color:


Needing a hands-on project, the owners installed the board and batten on one wall like in the hall bench and hook nook. They did an excellent job, don't you think? 

Tip: prime your boards before installing, caulk everywhere the board meets drywall, then paint all once caulking is dry. 


Notice the honeycomb pattern on the vanity! 

No real work was done in the bedrooms or master bath (yet) so we're going to jump right to the stunner.

In the last post I showed you the door way we cut into the hallway that will allow easier access to the kitchen. A few photos up you can see it by the entry door. But why did we do that? Reason number one: because there was only one entrance into the kitchen.

This is what it was...

                                                                                                                                                            ^^^
                                                                   Photos from original listing                             long, dark hall


Ready?

And this is what it is now!


 Notice the honeycomb pattern in the kitchen floor tile. 
Originally, I wanted the pattern to live-edge into the wood flooring but the amount of work and the cost made the decision to go with a straight edge the more cost effective choice.  


There was a thick fog that came in as the sun came up making lighting hard for photos.
 That view-even with the fog- is stunning. 

That was what I wanted people to see as soon as they entered the house- not some long dark hallway and that was reason number two for opening up the hallway wall and taking down the cutout wall.
 The kitchen area now has three access points versus just the one 
and oh, 
did I mention the view?

The house, when purchased, had wood on the ceiling and down the walls between the sliding glass doors. My initial thought was to whitewash it all but when the walls were 
painted a warm white the wood really did look beautiful. 
Also, many men hate painting wood!
 I think it is in their DNA. I knew it would be a tough sell to try to paint it.


We had to go with larger sliding glass doors than was originally in place (explained in the last post) and when finished the wood between them looked unintentional and out of place. 
The homeowners made an executive decision to have the wood around the sliders painted white! 
YES!

It completely makes the wall go away and all you see is the view. 
We did leave the wood ceiling unpainted. To disperse some of that warmth around the open space I had the strictly-decorative hood vent over the stove wrapped in the same wood.


 I am in love with the wall tile! It looks like waves and when the light washes down it reminds me of a sunset on the ocean. The countertops are gorgeous with a hint of the navy blue used in the cabinet bases and a greige; a nod to water and sand meeting on a shoreline but without being too busy. 


Note the wood stools, wicker and rattan around the space to pull the wood warmth.


That cabinet next to the fridge is hiding a little surprise...


In the pictures below you can see that we moved the dining area from where 
the original owners had it.


On to the dining area...  

                  I had a little hiccup in the design process... 

         We, homeowners and I, love the chandelier. It is a capiz shell lamp. I love the rectangular shape and originally wanted it repositioned to parallel the sliders and hung much lower.      

 In my mind I wanted the table positioned that way, too but space did not allow for that.

 That wasn't the real hiccup, though.                                                

         What was not good is that the beautiful chandelier disappeared into our wall color!

Whaa-whaa. 

                        Solution: we chose a color that matched the kitchen's base cabinets and WOW! 


This little seating area is now where the table used to be; a great place to curl up with a book, have a cup of tea or glass of wine and watch the boats in Buzzard's Bay.


A reminder: this used to be the first view of the ocean after the dark entry.


The property has an outdoor shower, fire pit and access to your private beach.


So, that's it! I love how it turned out. The owners love how it turned out! 

I had so much fun working on this project. I have said it before and I will say it again, I am not a trained decorator. I didn't go to school for any of this but I do love doing this kind of "work" and 
while I linger on this earth I am grateful that I get to do what I love. I am thankful for the opportunities to help others make the spaces they live in beautiful, comfortable and inviting.


Thanks for visiting with me and taking the time to scroll though all these photos! 
(Editing is not my strong suit!)

Blessings,
Jolena


Thursday, July 13, 2023

Before: A 1980's Beach House & Busy

Friends, it has been nine months since I've written anything for this blog! 

The past three years have really done a number on me and I have often wondered if anyone even cares about little things like making a home comfortable and pretty. It seems so trivial to me at times to even consider it in light of the problems of the world so I have allowed it all to keep me quiet... at least through this medium. I've talked to you about these things before here. 

God, however has given me other avenues to express myself. More about that later. Today I will just talk about one of those avenues. 

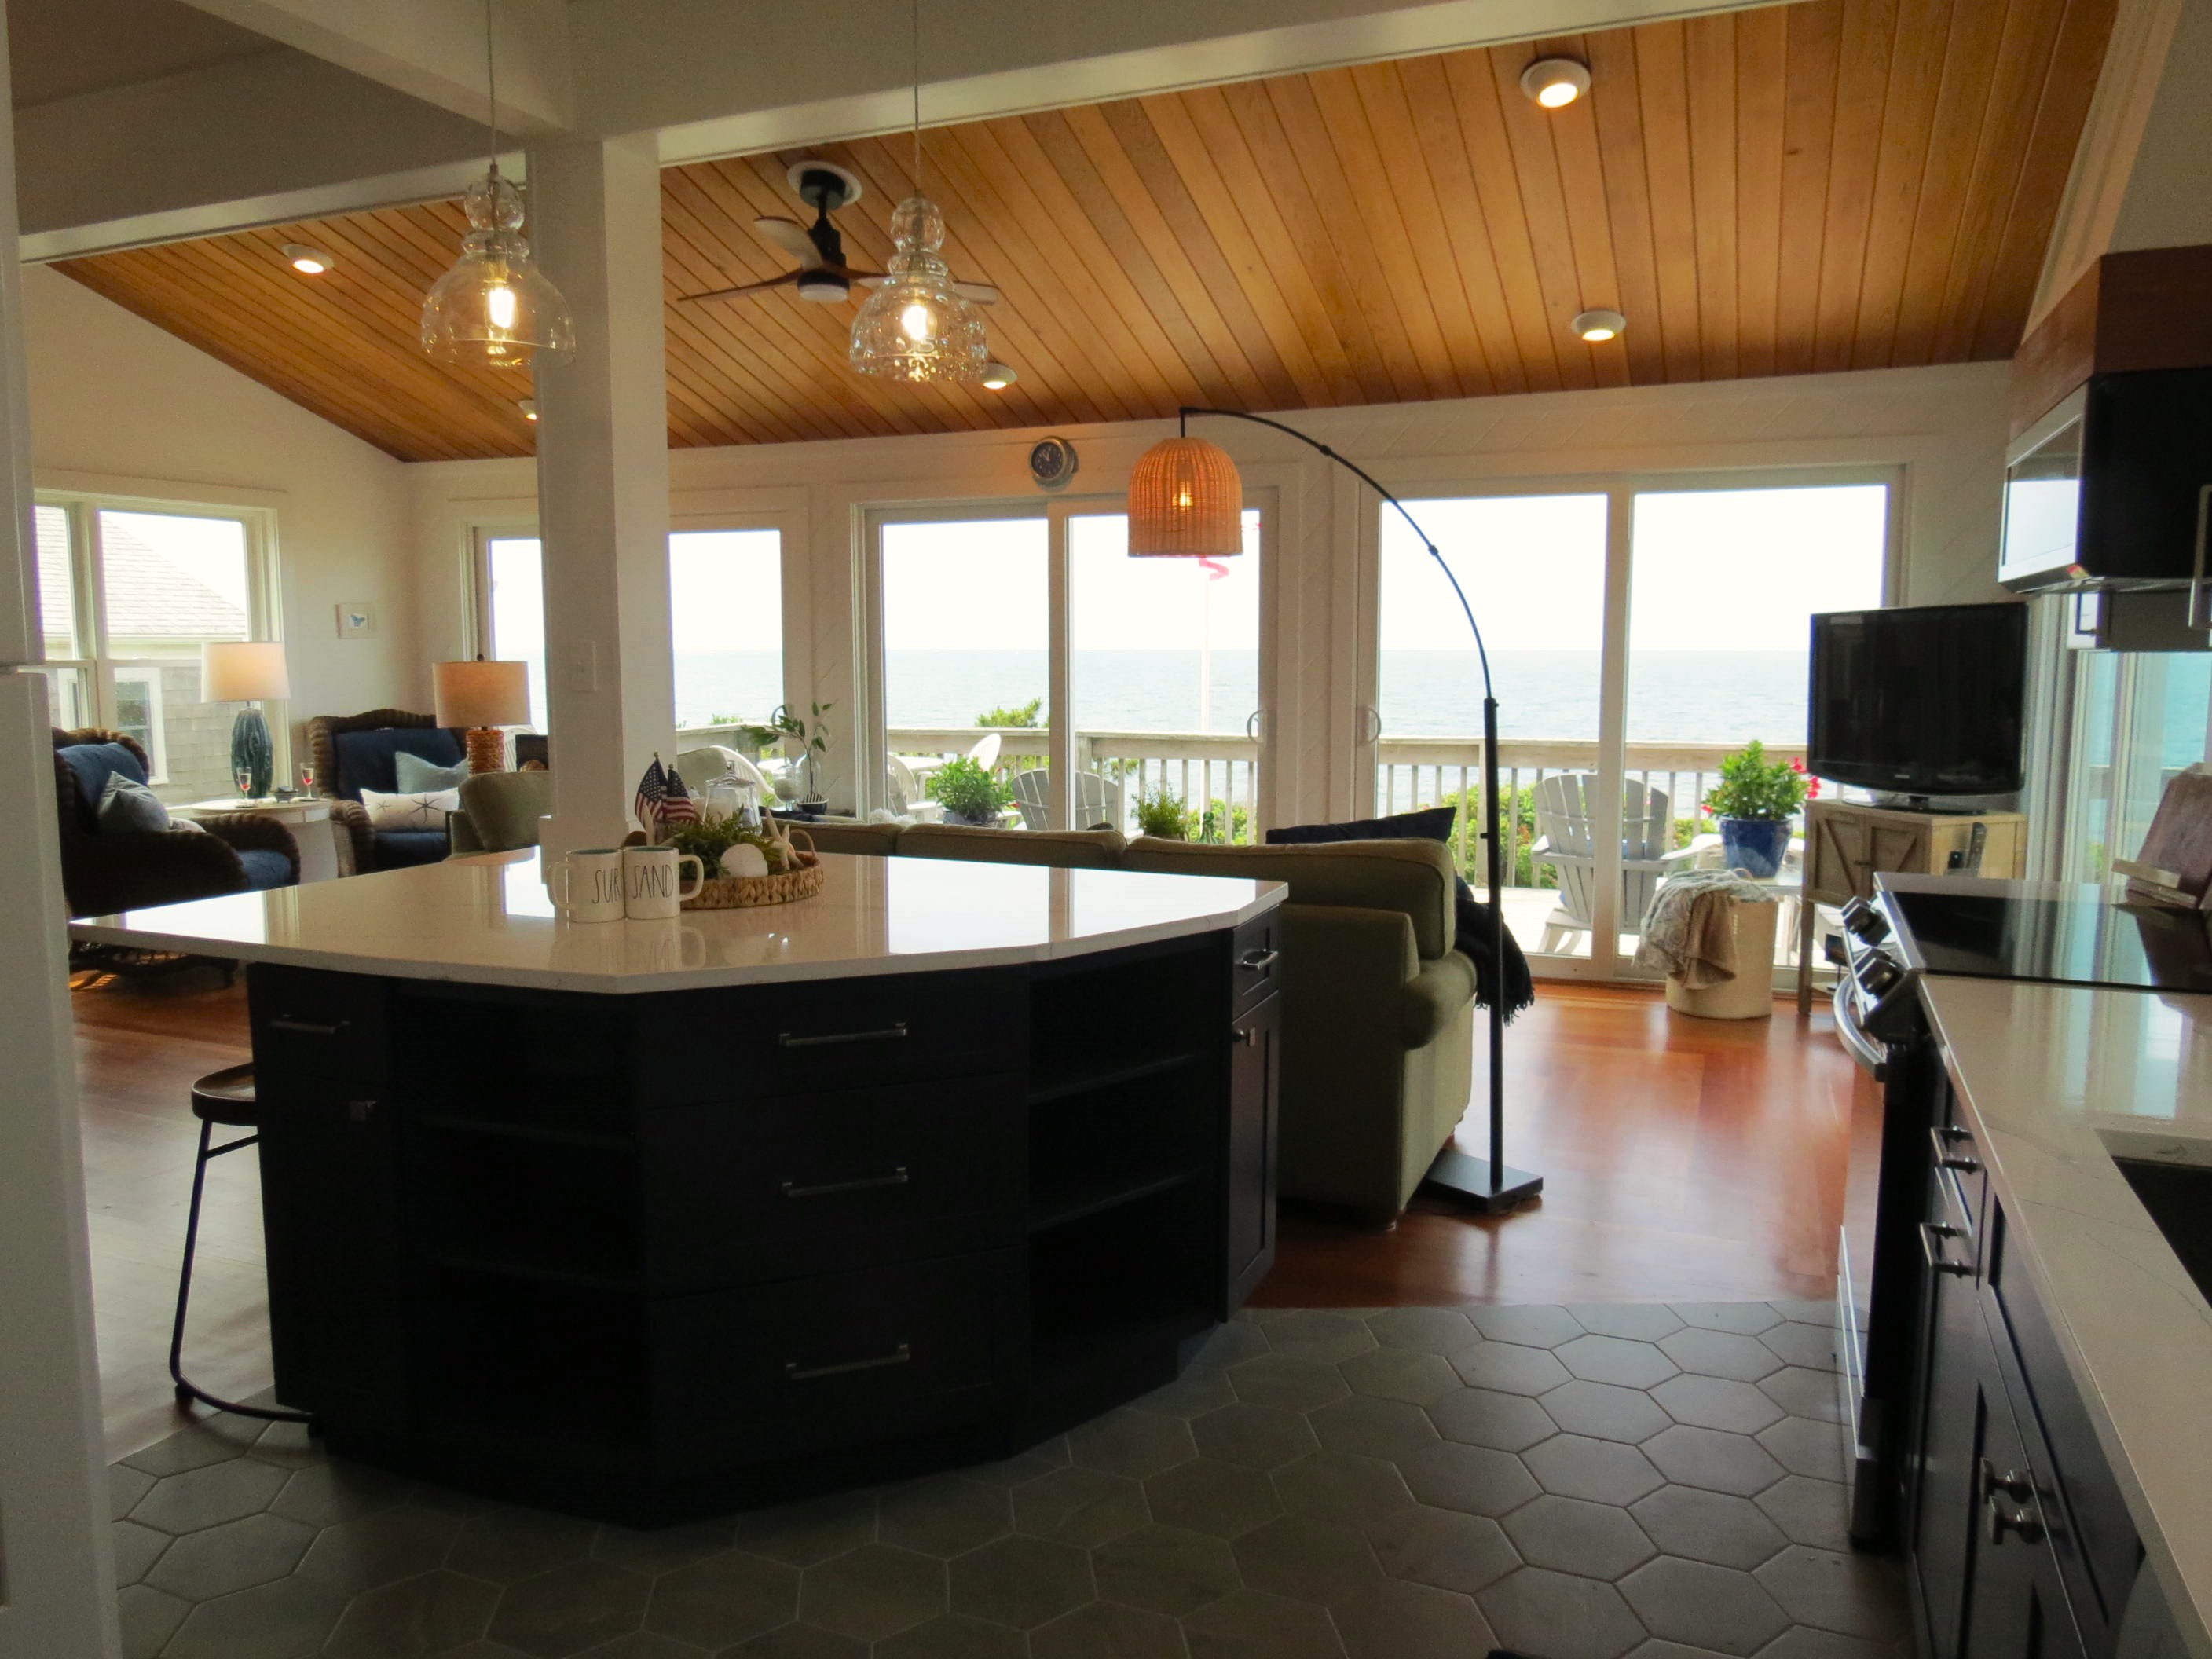
I took on a big project last fall.  A friend of mine purchased a beautiful, albeit dated (think 1980's) home on the ocean . The home is entered from the side. Upon opening the door the visitor was met with a long hall that spanned more than half the width of the house before being forced to turn left of right. A right turn would then reveal the ocean view. This is noting short of tragic in my opinion! 

The kitchen had only one entrance and was a U-shaped layout. If someone had the fridge, oven or dishwasher open you're trapped. There was a cutout on the left so that you could at least see the view. 

These photos were pulled from the original listing:

                                                                                                                  this is the hall way ^^^
                                                                                           behind those doors was the washer & dryer


Not bad, right? But it was dated and other than the view doesn't really feel beachy to me. 

The winter allowed for much planning time while we waited for work to begin. Contractors have their hands full as the force ages out and not many young ones are wanting to do this type of work. Thankfully, timing and scheduling worked well together on this project. The lag time before beginning allowed for many items to be ordered and stored so they were on sight when the project got underway.

Work to be done:

My main problem with the layout was that if I am at a beach house I want to see the beach! I don't want to be greeted by a long, dark hallway, like a ships hull-I WANT OCEAN! 

Solution: Cut an entrance into the kitchen right next to the main door so you walk in the door and see the sea. 

The next problem is that they are a family of seven and that kitchen was not going to cut it. They needed options. You can't trap people nor leave it that only one person at a time can comfortably work in there. 

Solution: Take down walls and reconfigure the kitchen. 

Full disclosure here-I am not a trained designer, I have no schooling, and no CAD software. I use graph paper and cutouts for furniture and cabinets! It's kind of like paper-dolls but more fun.

And demolition began! Immediately I could see opening up a door in the hallway was the right decision. What a blessing to find that there was a large support beam running the width of the house! That meant the two other walls enclosing the kitchen could come down! Drywall went up quick and it was looking good! 


Well, as it turned out, that beam was not spanning the entire width of the house, it was cut in two, supported by a post in the corner of the wall. A little configuring with the cabinet maker, the contractor, the owner and myself and we ended up incorporating it into what will be an unconventionally shaped  island. 

The sliders all had to be replaced as the seals were broken. We thought we wanted the ones with the blinds inside but that took up several inches of the view! That was NOT the effect we wanted!  

^^^ new slider(bad!)                 ^^^old slider                        ^^^old slider       

Can you see what we were loosing of the view? Plus they were smaller than the original and fixing the wood walls would have been a nightmare. The size we needed to fill the existing openings wasn't available, smaller wouldn't work. The husband took one look at the new slider and said we could go bigger! Whew! 

So, we went bigger! But you don't get to see that yet!

The downstairs, main floor, has two bedrooms with bunkbeds, a full bath, kitchen, living room, and dining room with a large deck facing the ocean. Upstairs in the master bath and bedroom. For this project we are focusing on the downstairs. 

The bathroom is getting a facelift...


So this was the beginning. The next post  will show you how it turned out. From the start of demo to the last photos took about three and a half months. 

I  did tell you I have other things going on that have been keeping me busy, right? So here's what's been going on...  

I got to speak at a women's conference in May about our steadfast God. We were expecting thirty-five women but prepared for fifty. "Who knows what God will do", my optimistic side quipped! Well, He shut my mouth when we had to scramble to find seating for another ten! It is so encouraging to see that so many women find encouragement and rest in the teaching of God's Word, especially in times like these.


But that's not all that is going on...

My youngest daughter got engaged to a sweet young man the day after Christmas! She completed an intense one year nursing program last month and is getting married next month and moving south, as he is in the military. There has been much joy intermingled with reflection, tears, new friends, old friends and new family members.


In a nutshell I haven't been writing much because we have found it essential to do life face to face, intentional, and practicing the "one anothers". 

I promise all the after photos in the next post! Stayed tuned, this is just the beginning!