

Now that my living room wall is planked it is ready for some color. This wall was a bit of a splurge for me so I want to make sure I don't mess it up. I want an aged, beach wood or barn wood sort of look but not really sure what I am after. Mister thought we should try a whitewash first.

Not quite what I was looking for. A trip outside to talk to a tree guy about taking down some dying trees sparked inspiration. Looking at the decaying maple tree in our yard has given me some idea of what we are after.

We did not want to use traditional stain due the smell and mess cleaning up. (I am not a neat DIYer.)
I thought I should test this out along with some ideas I have seen on Pinterest. I used all the cut pieces left over from our planked wall to practice on. This wood is pine, nothing extravagant.
I have been dying to try the instant aged technique and had read that you should let the apple cider vinegar sit with a piece of steel wool soaking in it for 24 hours before using it. I read another blogger that said she did not wait but just went right at it and got good results. I am not a patient person so after an hour I proceeded.

It left my pine kinda red-ish; not the look I am going for. Back to Pinterest...I read that if you first brush on a strong black tea that the vinegar mixture will react to the tannins in the tea and age better. , Okay, I gave it a whirl. Well, I still was not happy with that outcome, either.

I decided to wait at least 24 hours like some blogs suggested. 24 hours had passed and again, I tried just the vinegar on 1/2 of one board. Meh. I tried the tea with the vinegar over it on the other 1/2 of the board. That time I got a darker color but still not what I want so I will press on.

Mister said it was too much trouble and really wanted to find a one-step product.
We made it to Home Depot where I found a product called Varathane Weathered Wood Accelerator (VWAA) that claims to age wood instantly without the smell of stain; water clean-up. We'll give it a shot. And, I tried the VWAA and sorta liked how it turned out but...

thought a bit of white washed in would be the ultimate.

But, while I was at it, I wanted to try some other stuff, too...since I was practicing and all.

Totally different direction; I grabbed leftover paint from other projects in blues and greens and brushed them onto a piece, blending the colors and mixing in a light touch of the gray. I really liked this look but it's too much for the wall.

I used 4 tablespoons semi-gloss white paint I had on hand, mixed in 1 tablespoon of plaster of paris and 4 tablespoons room temp water to make a wash. I brushed it over the stain and I brushed it onto a new, untouched board. Still not satisfied, I will keep going.
I used the same mixture but this time used the dark gray paint we used behind the plank wall. While I liked the outcome of this mixture I think it will be too dark for the room. We want to lighten it up.
So I did it again on another board but then whitewashed the whole thing with my plaster of paris mixture from before and gray-washed some, too. Hmm...
On each board I went back over a small section of it with the vinegar mixture to see how it would look.

I posted a picture on Instagram looking for some direction/affirmation and I got it so I happily sashayed toward my plank wall with paint and stain in hand-quite happy with the decision. (By this time that vinegar mixture I had made was a few days old and was giving me a darker color but still not quite grayish so I decided to ditch that idea and went with the Varathane Weathered Wood Accelerator) I was all excited to start slapping that stuff up on the wood!


Once it was finished I stood back to survey my handy work and was relishing my good fortune of finding a product that worked right out of the can. Hmm...it seemed to be just a bit off from the wall color on the connecting walls. I wasn't sure if I was seeing what I thought I was seeing and then Mister rounded the corner and asked "Is that lavender?" UGH!!!! Yes!
No!
Yes, yes, sigh.
(Hanging my head loooow.) It's lavender but maybe it is just the lighting or something. Wait til the sun moves around, turn the overhead light on, do something, tilt your head, squint, anything.... UGH! It's lavender.
No!
Yes, yes, sigh.
(Hanging my head loooow.) It's lavender but maybe it is just the lighting or something. Wait til the sun moves around, turn the overhead light on, do something, tilt your head, squint, anything.... UGH! It's lavender.
I could also see the edges of the wood where we had so carefully made sure to space them. They were still the unfinish pine color. That's NOT going to work. So, now my thinking was that the vinegar stuff will give it all a woodsy color over the lavender gray and it will fix it.

GAH! Nope. My wall was now completely stained in the ironized vinegar concoction and it was blotchy because I worked from the left side of the wall first, then middle, then right side. As it continued to dry it was more obvious and I hated it!
What if I dry brush some white to distract from the blotchy?

Okay, this may work. Wait. What's happening? The vinegar stuff was turning the white a yellow color... it kept bleeding through...and it stinks like... vinegar! The whole point of not using traditional stain was that we didn't want it to smell and while vinegar is not toxic it still stinks. On all my samples why hadn't I noticed this?! Ugh!
At this point I told Mister, " I am a fraud! I have no business doing this stuff, why would anyone want to read about this?" He listened to me whine then told me that I would figure it out. Okay.
The vinegar stuff does stink. Mister said he didn't smell it but I did and felt like I had been for a few days. It only stopped once I brushed on a sealer. I used a bottle of water based wood sealer I had on hand and let it dry. The next day I hit the wall again with a watered down chalk paint in gray. Too dark.
I grabbed the white chalk paint, watered it down 50/50 and dry brushed it on. My blending skills need some work and the strokes were too much. I lightly sanded the whole wall then watered down more white chalk paint, 3 parts water to 1 part paint. With an old rag I washed the watered down paint on the wall.


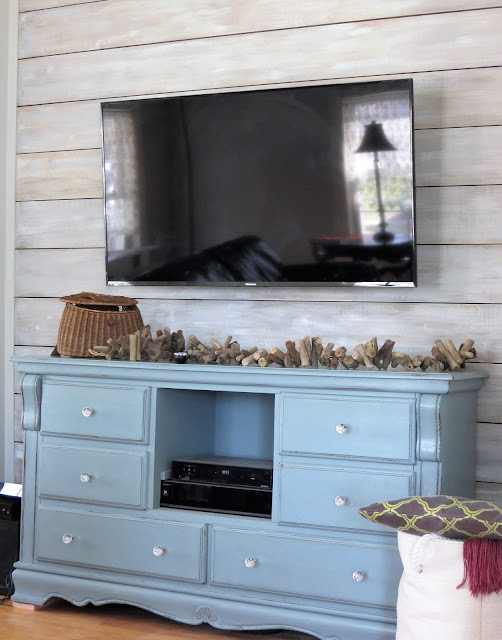
Ahh..... there it is. Not exactly what I started out wanting but with the adjacent wall color and the media cabinet I think it will do quite nicely. I lost most of the knots in the wood and the grain. A little of it does show through but not like I had started out wanting, but that's okay. I like the layers of colors.


Mister painted the lattice strips down each side the same color as the adjacent wall color. Leaving them like the wood planks seemed too messy going in different direction than the planks. Because of the spacing and the dark wall color behind the planks it does resemble a painted shiplap effect. I've been staring at it for about a week now and I have decided that I love it.

Next stop for this room is crown molding and then everything gets another coat of paint. Getting close to end in this room and I am so ready! Can't wait to share it with you, too!


Next stop for this room is crown molding and then everything gets another coat of paint. Getting close to end in this room and I am so ready! Can't wait to share it with you, too!


Important things to remember (learned from hours of missteps):
#1 It would have been much easier to do the edges before it was put up on the wall.
#2 Work one row at a time-don't stop and don't overlap. If you don't heed this warning it will be blotchy.
#3 Vinegar stinks.
#4 If you plan to paint over the vinegar stain you have to seal it so it doesn't bleed through.
#5 Don't give up! It may not turn out the way you wanted it to originally but you can end up liking the finished product as much or more than the original plan.
If you enjoyed visiting with me please subscribe by email or follow along through Facebook or Instagram.
Linking up at these parties:
Happiness Is Homemade, I Should Be Mopping The Floor, Creatively Living, Plucky's Second Thought, Mad In Crafts, Coastal Charm, Skip To My Lou, Cedar Hill Farmhouse, Cupcakes and Crinoline, Celebrate and Decorate, A Stroll Thru Life,Home Stories A to Z, The Crafty Blog Stalker, The Lou Lou Girls , Savvy Southern Style, Gingersnap Crafts, My Repurposed Life, DIY By Design, Ducks n'a Row, Gratefully Vintage, The Newlywed Pilgrimage, The Vintage Nest, Joyful Homemaking, Have A Cup Of Mrs. Olson, The Pin Junkie, A Delightsome Life, Our Hopeful Home, Up To Date Interiors, Katherine's Corner, Imparting Grace, The Charm of Home, Life With Lorelai, Shoestring Elegance, Olives n Okra. French Country Cottage, The DIY Village , The DIY Village, Shabby Art Boutique, Chic On A Shoestring, The Cottage Market, DIY Vintage Chic, The Boondocks Blog, Blooming Homestead, Ms Toody Goo Shoes, Pieced Pastimes, One More Time Events, Finding Silver Pennies, Nifty Thrifty Things, Re Do It Yourself, Stonybrook House, Dwellings-The Heart of Your Home, Create With Joy, Reasons To Skip The Housework, The Painted Hinge, My Heart Lives Here, Life On Lakeshore Drive, The Newlywed Pilgrimage, Remodelaholic, Craft Dictator, DIY Showoff, The Chelsea Project, Life On Lakeshore Drive, My Pinterventures
It turned out BEAUTIFULLY!!!! As stressful as it is when a project is not turning out as planned, I do love when it turns out even better!
ReplyDeleteThank you, Michelle! Thanks for following along and checking out the progress. One day this room will done... hopefully before I get the urge to re-do something else. hehe
DeleteYou are tenacious and I'm so happy that it's to your liking. It looks very nice and I hope you getting some well deserved rest. Thank you for sharing with us this week at Celebrate Your Story, have a great week and have a Happy Holiday.
ReplyDeleteHaha, no rest here, Sandra. This is just on wall in one room that we are working on presently. Funny how these things can snowball! Thanks for another great party! Hope you have a blessed Easter!
DeleteWow! LOVE the change! :)
ReplyDeleteI would love for you to share this with my Facebook Group for recipes, crafts, tips, and tricks: https://www.facebook.com/groups/pluckyrecipescraftstips/
Thanks for joining Cooking and Crafting with J & J!
Thank you, Jessica!
DeletePersistence paid off. It really did turn out lovely! A lot of work, but worth it in the end!! Thanks for sharing with SYC.
ReplyDeletehugs,
Jann
Thank you, Jann! Hope you have a blessed Easter!
DeleteIt was a lot of work for you but in the end it turned out very nice. It has depth and texture.
ReplyDeleteThanks, Debra. Yes, it was a lot of work but I learned a lot, too!
DeleteWow, you really did persevere until you got just what you wanted, kudos! You really explained all your trials and tribulations very well. I am not a patient person either so I feel your pain. I think I would have pulled my hair out:) Your outcome was fabulous, I'm so glad you're happy with it! Thanks for sharing at Vintage Charm! xo Kathleen | Our Hopeful Home
ReplyDeleteThank you for the visit and the encouragement, Kathleen. It is done and I am happy with it but I gotta say I don't think I will try it quite like that again.:)
DeleteOh shame, it's sooooo frustrating when that happens. But you carried on and it looks AMAZING now Jolena. Stunning. Thank you so much for doing all the hard work and the stain tests
ReplyDeleteOn a bright note, I did end up with some pretty painted test boards that will be showing up in my decor as summer approaches! There is always a bright side... like a visit from you. Thanks for stopping by, Michelle!
DeleteIt looks great! Thanks for sharing at Home Sweet Home!
ReplyDeleteThank you for stopping by and for the party!
DeleteJolena that was quite an adventure you went on. I have also done the vinegar thing, but I did it outside on my balcony. On the bright side, at least it is not toxic. Your wall turned out amazing. It has that warm beachy feel to it. Bright and sweet. Persistence will get you everywhere!
ReplyDeleteI am sure that using it outside would be okay but boy-oh-boy when you bring it indoors! As for my persistence- is motivated by my inability to admit failure! I am sure this is probably a character flaw but I happy with the results this time. Thanks for the visit; always a joy to see you here.
DeleteJolena, there really are no failures as with every step you gained knowledge of how something worked and may be able to use again in a future project! Good job! Keep on keepin on...never give up! I am into chalk paint furniture and sometimes do not come up with anything like what I was thinking and love it! Thank you for your blog info. Harold
DeleteThanks, Harold. Thanks for the encouragement and reading along.
DeleteYou have the patience of a saint. I hat trying to match a certain color, it always turns out like yours. Very frustrating, very tedious but if I keep trying it turns out gorgeous. And it did....I love it. You did a wonderful job.
ReplyDeleteAw, thank you, Christine. I am glad to know that I am not the only one. Sometimes I read blogs and their Pinterest attempts turn out picture perfect the first time. That never seems to be my experience. It must be one of my super powers!
DeleteIt looks great and I love the look in your living room. Thank you for sharing at Dishing it and Digging it link party.
ReplyDeleteAww, thanks Vanessa! It is always fun to see what's on the must see list at Dishing It and Digging It. I am glad you stopped by and hope you come back again, soon.
ReplyDelete