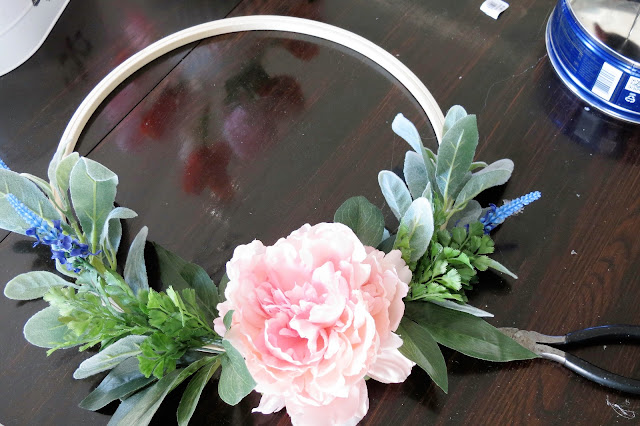
I went searching the in the Pinterest hole looking for ideas. I was seeing a lot of hoop wreaths. I have some embroidery hoops laying around, not being used.... I think I bought them for another craft project that never happened. Do you do that? Anyway, I decided that is what I wanted to do.
Armed with my coupons and an idea I went to the craft store and purchased one large peony, a sprig of green lamb's ear, a fern looking thing and some faux lavender. I found a welcome sign in a galvanized metal. I was looking for a little wood sign that said welcome or spring, or both. I went to three stores before finding the metal one. I didn't want the galvanized metal, but I can paint that. (Of course you can!)
First I took the hanger off the sign, marched outside and spray painted it an antique brass from Rustoleum. While that was drying I heated up the hot glue gun.
Remove the stem from the peony. Be careful on these multi-layer flowers as they will fall apart easily. Get the glue down into the center, on the underside, and hold it in place while it dries.
I cut the stems of the lamb's ear to fit my wreath and shaped them to match the curve of the wreath. I cut one smaller than the other as I do not want my wreath symmetrical. Hot glue the base in place and hold in place while cooling to prevent moving. This will be a larger dollop of glue so it will take a minute or two to cool. Use a scissor tip or something pointed to hold in place. You can spot glue a place or two up the side of the wreath.
Cut the lavender from the bunch. Mine had three stems on each bunch. I only ended up using one bunch. Hot glue them in place. I did two on the larger side and one on the smaller.
Next, I cut two stems from the fern-like thing and proceeded to glue them in place. At this point I thought I had enough so I held the peony in place but felt it needed just a little more. I used the two leaves that were on the peony stem. I glued one on each side and then glued the peony in place.
Happy with the wreath so far I went outside and retrieved my dried sign. I used clear filament to attach it the wreath and held it up. The sign slid to the side in a mess. I repositioned the sign and put a touch of hot glue on the backside to hold the filament string in place which worked perfectly.
Here it is in the living room.
I decided I didn't really like it over the mirror so I moved it to the hutch.
It looks perfect against the old frame I purchased at the closing of one of my favorite monthly markets. (I'll miss you Vintage Thymes!) My plan was to move it to the front door after St.Patty's Day but I don't think I want to move it now.
The total cost of this project (using my coupons) was less than $20. I love the way it looks, light and airy and ready for Spring! Hope you found this tutorial helpful and easy to follow.
Thanks for visiting with me today!
Jolena
Party time:
Our Home Away From Home, Celebrate and Decorate, The Dedicated House, Shabby Art Boutique, Life With Lorelai, Up To Date Interiors, Life Beyond The Kitchen, Chic On A Shoestring, The Cottage Market, My Pinterventures, Plucky's Second Thought, The Stone Gable, A Stroll Thru Life, The DIY Dreamer, April J Harris, Home Stories A to Z, Ducks N'A Row, The Tip Junkie, Flamingo Toes, I Should Be Mopping The Floor, Skip To My Lou, The How To Home, Lou Lou Girls, Savvy Southern Style, Gingersnap Crafts, DIY By Design, My Thrift Store Addiction, Katherine's Corner, All Things Beautiful, Imparting Grace, My Repurposed Life, The Charm of Home, The Vintage Nest, Jann Olson, A Delightsome Life, Olives-n-Okra, Ms. Toody Goo Shoes, Pieced Pastimes, One More Time Events


I had no idea that you blog. I blog also. I like to think I would make this wreath but am afraid to buy the items needed because I know my self. I do love the wreath.
ReplyDeleteThat's exactly why I had the hoops! I bought them about 2 years ago for something that never got made... Too funny but glad to know I am not the only one. Now I am heading over the check out your blog. Thanks for stopping by and for the kind words.
DeleteYour wreath is gorgeous against the dark green frame. I love how you created this. The wreath brings it to a whole new level. Thank you for the inspiration.
ReplyDeleteThank you for stopping by and for leaving me such a sweet comment. If you end up making one, pop over to my fb page and share a picture. I would love to see what you come up with!
DeleteSo lovely! Thank you for sharing at Vintage Charm! Pinned!
ReplyDeleteYay! Thank you!
DeleteVery beautiful and clever Jolena! Thanks for sharing it with SYC.
ReplyDeletehugs,
Jann
Thank you, Jann. So glad you could visit with me!
DeleteAbsolutely adorable! Pinned. Shared and Featuring you tomorrow morning! Thanks for joining us at the TFT Party!
ReplyDeleteTheresa @ Shoestring Elegance
That's exciting! Thanks you, Theresa and thank you for visiting with me!
Delete