Monday, July 28, 2014

Needing a little help

We needed a break so we took off for Washington D.C. It was a nice 3 day trip, spur-of-the-moment kinda thing. We cleared our heads, got to see our nation's capitol and came back ready to do this thing.

Over the past week we have worked to finish the molding and little odds and ends that needed to be cleaned up.

It took some time and patience but we figured the crown molding out. Since the spacing was an issue we used baseboard molding to take up some of the space above the cabinets.
Upside down baseboard molding gave us some working room.
It allowed us to compensate for things not being quiet square and for a ceiling that is anything but level and flat. It makes the molding look a little more substantial, also.


There are some places that we will have to become a bit creative with like over the bathroom door. The door frame and molding is level but the ceiling is not. In order to correct the molding we would have been left with a lot of caulking at the ceiling and that would have had to continue around over the back door. We did not want to do that so we went with the asymmetrical look and we will paint the space between the door molding and crown molding the same color as the molding. Hopefully, it will trick the eye.
Notice on the right side over the door- a sliver of gray...


We had the same scenario over some of the cabinets but once all the molding got up your eye is not drawn to the fact that one side has a 1/2 inch space of baseboard molding showing and the other end has almost a full inch. The eye just sees lines and white and moves on. It is not perfect but I can live with that.

The beam that cuts through the center of the room got scotia molding to finish it off and give a little something in keeping with the rest of the molding.

This is the only return we had to cut in the whole room!
As you can see, there is a little patching that needs to be done
before the final coat of paint.


Now I have to make a decision. We have come to the tile. I have the tile picked out and I do love it...


but am not sure how to do the install. I only want it on the wall behind the stove, under the microwave. My problem is that those cabinets do not go all the way to the window and so where should I stop the tile?

The outlet is behind the utensil caddy on the left.

Should I stop it in line with the cabinet edge? If I do that I have an outlet that will be half in the tile and half out! Oh! Why did I not think about this before the electrician put the plug there? According the codes in our state because there is a countertop there I have to have an outlet there. I am not plugging anything in there (pay no attention to the fan plugged in the picture).  Seriously, on a regular basis the outlet will sit wasted. So, what should I do?

I need help. If you have any ideas please feel free to weigh in.

The final coats of paint will be going on soon. We are nearing the end. Time to start thinking about the next project. Of course, this project has definitely brought about the need for other projects. We still have not sanded or painted the ceilings in the adjoining rooms that were affected by our electrical issues but that is for another day. Stay focused!

Monday, July 21, 2014

Stepping out of the supporting role.


My Mr. has been working very hard to get things done in the kitchen so I decided to tackle the bathroom shelving myself. I found some inspiration on Pinterest and got busy!


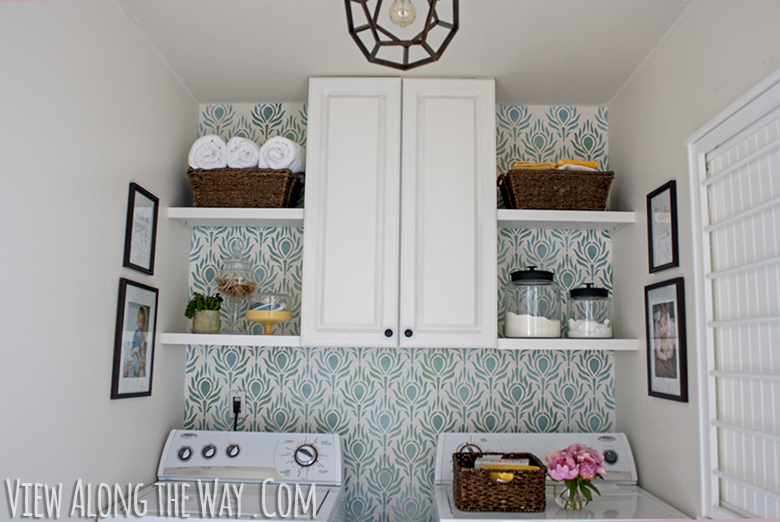
Updated laundry room with stenciled walls, DIY light and cabinetry
My inspiration from http://www.viewalongtheway.com/2013/01/laundry-room-reveal/
I wanted to use some molding to set my shelving on which means I got to use the miter saw!


I am a novice at the whole electrical tool thing. I do much better as Mr. FixIt's go-fer (you know, go fer this and go fer that). Basically, I play the supporting role. I am also really good at cleaning up when he is done and at asking questions that make him question himself like "are you sure that was a right out-side corner cut and not a left inside corner cut?". Yes, he is a patient man.

I measured and used a level to draw my lines right on the wall. I cut the molding to sit on the pencil line along the outside wall and the back wall, mitering the corners and assuring myself that caulking will fill in any spaces I could see.

Caulking already applied!

I used nails to attach them. The shelves are not holding a lot of weight so I am not worried about using nails versus screws. Oh, I did drill into the molding before driving the nails to keep from splitting the molding.

Mr. FixIt had cut the shelves for me a few days before so all I had to do was drop them in. The shelves were not stable yet. I checked for level again and drilled through the cabinet into the side of the shelves making sure to counter sink the head so that it does not stick out in the cabinet to catch on things (mainly, my hand as it scrapes by). After they were secured to the cabinet I drilled into the top in the back corner of each shelf at an angle catching the molding and the corner studs. I put in the screw making sure to counter sink the head, again.

Have I mentioned I am not the most patient person when it comes to diy-ing? It applies to painting, too. I tend to rush too much and make a mess. I can never stay "in the lines" I can never manage to keep my hand from waivering onto plains that I did not want painted so I tape. I used Frog Tape (I was not paid to say that.) I learned that I am also an impatient taper! Where I took my time and taped carefully it worked well. Where I missed a bit Mr. FixIt will touch up when he does the final coat on the walls.
Messy, messy, messy!

At this point I realized how bad my caulking and filling job was.


After everything had a decent amount of time to dry (24 hours-don't judge) I dressed the shelves. I know, I still have crown molding to do and still have to paint the trim. The walls need another coat and on and on it can go but I needed a boost to spur me on and so I decorated.

Looking back at the inspiration photo I think I need to add
some warmth-maybe some baskets up top or a wooden box...

So, my bathroom is in good working order. There are a few more things that need attention but for now I am quite happy with my shelves. Mr. just nodded when I showed him. I don't think he is worried about me taking over any time soon.


Tuesday, July 15, 2014

Everything in it's own time.

We are still working on the kitchen/laundry room renovation. Admittedly, we have taken a few breaks but this is getting old. I am reminded that I really did not want to complain and so if this sounds like I jumped on to the Big-Ole-Complainy-Pants Bandwagon it is simply because I have.

A friend recently asked about the progress and when I told her where we were she likened it to the last few boxes of stuff to be packed when you are moving. Yes, that's it! It seems like just a couple things but the next thing you know you've packed three boxes and have to go to the store to get more.

We are working on the crown molding and purchased a handy-dandy Kreg jig to help with the cutting. I do not understand that stupid thing! Your molding does not stay still on the jig. You have to place your hands dangerously close (in my opinion) to the blade of the compound miter saw. There is something about a spring angle which is the inside of an angle that you need to figure out in order to get the right cuts. I would explain it all to help you out with your projects except... I have no idea how it works! I have tried. You have to measure and cut upside down and backwards and honestly, it is enough to push this impatient diy-er over the edge. Mr handles it a lot better than I do.

We had to build up the top of the cabinets to hold the filler piece that takes up some of the room between the cabinets and the ceiling. The filler was not quite as long as we would have liked. Hind sight being 20/20 we would have ordered that differently.  You really want it to take up as much space as possible otherwise you are having to back fill space to have something to nail into. The first night went well; slow, but well.

The next night was a nightmare! We could not get a nice tight fit for anything. We measured and cut. Measured again and cut again.... and again. What is wrong with this stupid thing! My Mr. was not happy. I had no explanation and finally he gave up. We had wasted two pieces of molding and a whole nights worth of work. The cabinet order only had three pieces of molding with no extra for mistakes and we had just made many. He did not like what he was seeing; he took it all down. "That jig is going back to the store!", I declared.

He started taking the jig apart to fit it back into the box and there it was. Remember that spring angle thing? Well you set that number on a dial on the bottom of the jig. Somehow that had gotten moved from it's original setting. How that happened nobody knows but I am blaming poor design. So, we bought more crown molding and did not return the jig. We now have plenty of scraps to practice on but we have run out of steam on this one. It was mega discouraging so we are taking another break for a couple days.

I was feeling really bummed about our lack of progress. I started writing this post and now can't get pictures to load! Is there a disturbance in the Force?  I was looking at other bloggers out in "finished project world" and their progress and thinking I was never going to make it then I read about another diy blogger who was going through the same thing.  Kristi, over at Addicted 2 Decorating, pointed out how comparison steals contentment. Boy, that was just what I needed to be reminded of. I am exactly where God intends me to be right now. Learn the lessons, give Him the glory and take joy in the many blessings.

I have gotten stuff done. The bathroom cabinet and shelves are done. I need to be content with where I am for now.We have plenty to do to keep us busy apart from the renovation. Our lawn has been so neglected this year. We've only been to the beach once and we love the beach. It is the only thing that keeps us going when the winter drags on....the thought of summer at the beach. Summer is flying by! The kitchen will be there when summer is done. I can cook in it for now and my dishwasher is AWESOME! Yup, still at that parade! Chin up!

It will get done when it is meant to be done, in it's right time. I will post pictures soon of the bathroom/laundry room.

Wednesday, July 2, 2014

Chalkboard DIY

Okay, so a new kitchen means there are some changes other than countertops and cabinets. One of the things about our old kitchen that drove the Mr. crazy was the refrigerator. It was my place to post anything that I was actively trying not to lose; an old Red Sox ticket stub, an invitation to a baby shower, the recycling schedule, the picture a friend's child colored for me... You get the idea. The fridge is now completely surrounded by cabinetry and that leaves only the face of the fridge for a magnetic surface.

Pay no attention to me or the cannoli from Mike's Pastry.
Notice the clutter on the side of my fridge!?
(Seriously, eyes off my cannoli!)
The other change was that I have very limited wall space left in the remodel. There are upper cabinets now where before it was just two adjoining walls with a table and chairs pressed into the corner. I had made a chalkboard from an old frame found at one of my local haunts. A piece of luan served as the board and with some handy-dandy chalkboard paint ta-da, I had a chalkboard. I loved it. It hung over the radiator in the kitchen and served as a changing piece of art depending on the season or my whim.

The old chalkboard from 2012.
So, two issues and I needed a solution. I missed my chalkboard and the fridge was off limits. I am sure you are already ahead of me here....A magnetic chalkboard is what I needed! I had found a frame a few months ago and now I was going to use it!

A few months ago I found a lovely picture frame and had thought it would be beautiful in the kitchen but had no specific plans. As time went on I considered using it in the bathroom; making a box with a shelf and surrounding the whole thing with the decorative frame. That idea is still floating in my head but using something different than a picture frame.

Here is what I did. I did not have to do anything to the frame. It was perfect just the way I found it. I purchased a piece of sheet metal from Home Depot. I brought it home and realized that my magnets would not stick to it! I took it back and called around. I found thicker, magnetic sheet metal for about $25 for a three foot by three foot piece. My frame was not that big so I measured out what I needed (measuring the inside of the frame and allowing for a little wiggle room) and used tin snips to cut it. BE CAREFUL! This stuff is sharp and it will bite! I would suggest wearing work gloves. (I didn't but I am a mom and most function often with a "do as I say, not as I do" attitude.)


This is the thicker, magnetic stuff.


Sharp, sharp edges-Beware!

Next, I spread my painting sheet in the back yard and used something to elevate the metal off the cloth. Once it was steady I sprayed the metal with chalkboard paint. (I probably should have primed it first but I am also a terribly impatient DIYer.) It took three coats to cover the metal well. Allow proper drying time between coats per the directions on your product.


Coat #1


Coat #3

When the paint was dry I used spray adhesive to attach the metal to a piece of foam core board cut the same size. This was to give the metal a little more stability once it goes into the frame.


I allowed the paint to cure for 24 hours then rubbed the entire surface with the side of a chalk stick. After that I wiped it down and was free to write what I wanted on the 'board'. I adhered the board to the frame using hot glue.

My handy-dandy hot glue gun!

Little dabs in the four corners secured it then I filled in the sides with more hot glue on the back . I cannot hang my piece yet as we still have not put the final coat of paint on the walls but I am quite pleased with the outcome. Now to just resist the urge to clutter it up!


This is where I realized that I didn't show it's magnetic abilities.
I will update with better pictures later.

UPDATE**
I still don't use it for the magnectic possibilities.... No, you can't see my fridge. 

Linking Up: Remodelaholic