Saturday, March 18, 2017

Antique Shops, Collectives, and Repurposed Home Decor In Massachusetts

Shopping! I was raised to shop. Some people train for the Olympics, marathons and the like. I was trained to shop. Couple that with my mom's affinity for Home Interiors parties (remember them) and the like. Growing up in the military forced us to edit our belongings each time we moved. There was not a lot of room to hang onto to things for sentiment sake and we weren't near family that allowed for hand-me-downs and family heirlooms. These factors combined have worked to form my love for beautiful things with a history that can be saved, reworked and made useful in our home and maybe I can pass them down someday. Recently, I was asked to write about local vintage and antique stores in my area. Oh, I can do that! (Clicking on the names of each business will take you to their Facebook pages for times and more information.)

I enjoy walking through old mills filled with booths of stuff someone has saved from the dumpster or landfill. I like trying to find decorative pieces for our home, as gifts of friends, and gather ideas for upcoming projects. There are a couple pop-up monthly markets that I frequent. Vintage Thymes Monthly Market, 500 Providence Highway, Norwood, MA, was the first one I started attending regularly. They used to hold their market in an old mill building but are now located in a strip mall. While they host several regular vendors they also have guest vendors each month. In the fall they host one of their markets on a farm in the town next door to them. I have written about my trips to visit them before here and here. 


Trisha from Vintage Prairie Home, 55 Sterling Street, Clinton, MA,  hosts another of those pop up markets. Her style is the farmhouse style that everybody loves. She finds great pieces, reworks them and showcases them in the sweetest vignettes. I have written about her markets here and here. 


Now, if you're looking for things that you can turn into something of your own these are places I find myself haunting:

Counting Sheep Antiques, 79 Central Street, Berlin, MA is nestled in a pastoral setting along a windy road in central Massachusetts. As you approach the cheerful yellow house and attached barn space you are greeted by an old pick-up truck begging for a photo with you.


You'll love Kim at Laurel Grove, 339 Boston Post Road, Sudbury, MA. This is their new address and they will be in there April 1, 2017. If you are reading this post before then- check their Facebook page for the address. Here you will find pieces that have been saved and restored, you will find Fixer Upper style pieces, hand painted wood signs, ect. The new, larger space allows room to hold classes like the recent Make Your Own Farmhouse Clock class taught by Trisha from Vintage Prairie Home.

Crompton Collective, 138 Green Street, Worcester, MA is another must stop place. Clothing, furniture, reclaimed and restored pieces are mingled in with handmade soaps, chalkboard art and jewelry. Various classes are held here, there is an event space for rent; who wouldn't love a wedding reception in an old mill building strung with glow of globe lights bouncing off the bricks!? They also hold a farmer's market on Saturdays! 

Signature Finishes at 204 Worcester Street, North Grafton, MA has a nice selection of Miss Mustard Seed paints, many vendors selling restored, refurbished, or reworked pieces. Tons of inspiration just walking through. Furniture painting classes are offered here. 

In the opposite direction you can find Wrentham Country Store, 15 East Street, Rt.140, Wrentham, MA. It is home for a lot of different vendors. You can find repurposed stuff, stuff waiting to be repurposed outside in the shed, primitives, shabby chic and everything in between. They usually hold a White Sale in the spring. Here is one I attended a couple years ago.


Antiques on 1A, 416 South Street, Rt. 1A, Plainville, MA, looks like a small store from the outside but when you get in there you will find little nooks and crannies chockablock full of stuff. 

Sandra at Gracefully Restored, 755 Wasington Street, Holliston, MA has a great eye for farmhouse chic. Her painted pieces are beautiful. The shop is sweet and sparks the imagination like crazy. The town boasts several other antique shops you'll want to budget time for, as well.

Winsmith Mill, 61 Endicott Street, Norwood, MA, houses several different shops all in one massive set of old mill buildings. This is a day trip. I could spend hours in there. The shops are actually spread out over two floors and three buildings.

More immediately local to me are the following places; 

Bernat Antiques,  89 Elmdale Road, Uxbridge, MA, is another lovely old mill building. They occupy the basement and first floor of the mill. There are tons of vendors in this establishment. This is their forth move since I have known them and the space is perfect.You can find just about anything there; primitive items, industrial, toys, ... you name it.

Joyful Things, 432 N.Main St, Uxbridge, MA, is a hop, skip and a jump from there. I always find fun and unusual things to look at when I stop in. It is a small shop but again, chockablock full of stuff.

And, Mary at Whitinsville Art & Antique Center, 202 Church Street, Whitinsville, MA,  has a varied selection of vendors who are constantly changing out their booths and adding more and more goodies. She happens to be neighbor but I don't see her much since she opened the shop so tell her I said hi when you stop in.

And if you're not looking for something that has been reworked, dusted off or cutely displayed Rustored Salvage, 201 Hopedale Street, Hopedale, MA, is a must. You can find old industrial lighting, wood mill carts, metal cabinets, mannequins. This is a new place to me and it did not disappoint. The hours are limited. Please check their Facebook page for information and times, as with all the businesses listed here.

This, of course, is not an exhaustive collection. I live in a great area for all kinds for treasures and new-to-me lovelies. If you're in the area these are some of the places I like to frequent. Not only can you find things to spark your creativity but if you're not a creative person, yet enjoy the work of those who are, you have to make a ride!

Thanks for stopping by. I hope that if you like what you've seen here that you will follow the blog or follow me on Facebook, Instagram or Twitter.

~Happy Shopping! 

Saturday, March 11, 2017

Shiplap Wall-An FIY


Who doesn't love Chip and Joanna Gains?! My favorite part of their show is their interaction with one another. The way they work as each other's biggest cheerleaders makes me smile. Knowing there is someone in your corner, rooting for you always.... sigh. And, if that person happens to be the love of your life....bonus! Sometimes, I think Mister and I are very similar although personality wise our roles are reversed. I would be the one trying on tool belts and lederhosen in the antique store...

I think I have seen every episode from past seasons multiple times. When I first saw shiplap I thought "Oh, that's kinda nice". As time has worn on and the nation has embraced the Gaines' a collective love of shiplap has swept the nation. Oh, I know there are some that probably don't like it and to each his own... but come on- it's everywhere! You can't sign on to Pinterest, Houzz, bHome, and Hometalk without seeing it. The more I see it the more I want it....but where should I put it?

As I've previously told you, we've embarked on a remodel project quite by accident. You can read about it here. What started in the living room led us to our bedroom. That led to a wall being dismantled and rebuilt. We took that plaster and laths off but left the original framing and added insulation for a sound barrier between room. Of course, all that meant repainting. And here's a kicker for me... I wanted it white! Yup, white. As a military brat I developed an aversion to white. All our walls were white in the military- no color allowed. Since then I have had rooms red, green, blue, pink, purple, brown, yellow, gray... just about every color but white. But, I digress. So, as long as we are repainting I might as well try to fit some shiplap in there! Now remember, my house is old which means ceilings are wonky and floors are not level and there is no such thing as a 90 degree angle. Shiplap kinda needs at least one of those things to work off of. Hmm.

I scoured blogs and all the aforementioned sites for help. I didn't really find anything pertaining to my situation but I was not deterred. When I thought I had a plan I took off to Home Depot for some fact gathering and pricing. My thought was that I would purchase 1/4 plywood, have it ripped down into 6" strips and uses those as my planks. This would minimize the overall weight on the wall, eliminate the need to remove the baseboard Mister had already reapplied. I could fudge the spacing to make up for some of the wonkiness of the walls. I was using this as my inspiration; found on Pinterest.

Shiplap!  Oh the things husbands do for us!  Can I just say I am so happy we did this?  It makes the wall behind our bed  a focal point and the project was actually easier than expected!  To do the shiplap wall, I bought four sheets of 4'X8' sanded plywood at  11/32" thickness.  I had Lowes cut it in 6" strips.  At $.25 per cut it was  worth every penny.  The total cost for the project was under $100 for a  160"by 90" wall.  My husband started at the baseboard and used one full 8' board and c...:

Okay, so my Home Depot will not cut the plywood that small. The smallest they cut is 24". That means I will still have to rip those down on the table saw. We don't have a great table saw or room for it. We end up with a saw horse and saw on the driveway and the cuts tend to be a little less than perfect. Not the look I was going for. My Lowes store would cut the pieces into 12" strips which would still require me to break out the table saw. Hmm. I came back home and looked at all the blogs again that have stores that cut their wood smaller. Maybe I should to move to where those stores are! Or, maybe I should take a road trip to one of them and come back with a vehicle full of ripped down plywood. I don't think Mister would go for it...

Then I came across another blog that showed a beautiful pitched-ceiling room with a window on the gable end. The shiplap was pretty and clean... but it wasn't shiplap!


Following Emily's lead, here is what I did:

I wanted to reposition the bed against the wall that had just been rebuilt and that is the wall I wanted shiplapped. I busted out my big level and grabbed a couple pencils. With a yard stick I measured down the center of the wall every 6 inches, making a small little mark. I used the level to draw parallel lines mimicking the wood planks. Sometimes my metal level left marks on the wall. This happened because we did not change the framing and so the studs are not uniform meaning the drywall is not quite flat-leaving high and low places in the elevation. For the most part the marks erased off or washed off but there are a couple that will require a little touch up paint.


When I was done I stood back. My pencil lines were too skinny. I grabbed a colored pencil in gray and went back to the wall. I used my yardstick to come just under the first line and made a parallel line and filled in the space between with my gray pencil. I stood back several times making sure the lines were thick enough. Ha! An FIY (Faux It Yourself) Shiplap Wall.

As I stand back from the wall it really looks off because of the ceiling not being flat or level but I have a plan for that. I'm not gonna lie... I am worried that I may have to have Mister repaint the wall. Ugh.  I will press on first to see what will happen when things get into place.


In my inspiration photo, the blogger went back over her lines with a sealer to keep the lines from getting smudged. I have not done this as the wall has the bed against it. I may change my mind but for now I think I'm okay. This has become a long post so I will spare you all the fears and worries about when "level" according the level doesn't look level to the eye. It will all work out...right?


 So, that is it for now. Stop back soon! ~ Jolena

*I forgot to add a picture of the finished shiplap...just a peek... I'll show you more when it's all done.

Friday, February 10, 2017

Decorative Wall Crown Tutorial


I need a crown! No, that is not an ploy to make sure my family know I should to be treated like a queen (ha!) and no, there was no costume party... not that type of crown. I was looking for the type of crown that hangs on the wall and usually has some kind of fabric hanging down from it. I found pictures on line....

like this on Pinterest...

Valicity Decorative Wall Teester Bed Crown:


and this, also on Pinterest...

French country antique Louis Philippe bed with contempary French fabrics and antique French Louis XVI mirror:

....but I didn't want to spend a lot of money. How can I make it for less? Here is what I came up with.

Materials

Foam core board
Metal decorated edge trim or flat lace 1.5" tall
Lace 4" tall
1"x1.5" piece of wood-36" long. (I think I bought it at A.C.Moore's by the doweling)
Tacky glue
Plastic wrap
Gold spray paint (or any color you want)
Small 'L' brackets-2

First I guessed at about how big I wanted my crown using a tape measure bent into a semi-circle. Also I was trying to use what I had on hand! I cut a piece of  foam core board 20" long by 4" wide using a metal ruler and an Exacto knife. Tip: make several passes at it, do not try to cut all the way through the first time and put something underneath to protect your floor, table, ect.

My 20" x 4" piece of foam core wouldn't bend enough and I did not want to break it. This is where my obsession with home improvement shows pays off a bit. On one side I measured out and marked approximately 1" intervals; about 19 marks. At the first mark, with my Exacto knife, I cut across the board, cutting about 1/2 way through the foam. (Be careful not to cut all the way through.) Just a hair next to that first cut I made another cut parallel to it but at a slight angle into the first cut. I used the tip of the knife to dig out some of the foam to form a channel. I repeated that procedure another 18 times or so until the 20" long foam core board has about 19 very thin channels cut into it. This will be the inside of the crown. Now your board will bend nicely but still have good structure.


I wanted my crown to have points. I purchased a 4" deep piece of lace with pointy things to go at the top of my crown. Laying my board flat I measured a piece of lace to match. My lace has tall points that would have made me cut into one of the points making it uneven. I chose to shorten my board a smidge to fit the lace pattern. Pull out a cookie sheet or cutting board and cover it with plastic wrap. Pour some Tacky glue into a bowl and put your lace into it. Using your fingers really try to work the glue into the lace. This takes some effort, don't skimp.  When it is sufficiently saturated lay the lace out flat on the plastic wrap. I wanted my lace to fan out at the top so I rolled up a piece of tin foil and scooted it up under the plastic wrap to push up the top edge of the lace. Leave it to dry. Depending on the weather this can take a couple days.


There is a "lace" at the bottom of the crown. On my crown I used a piece of metal trim that I had laying around from a project from several years ago.


If you do not have this or cannot find it, don't worry, just use another piece of lace. This lace should be about 1.5" wide. Cut it about 1" longer than your board. Follow the same steps you just did for the top lace. Lay it flat on the plastic wrapped cutting board to dry.


Once your lace is completely dry pull it off the plastic. The plastic may stick a bit, don't worry. Use tweezers to pull bits off. Run a generous amount of glue where your top piece of lace will lay on the foam core board. In my case it was about the top 2" of the board. I laid the lace on top of that. Do the same for the bottom lace making sure to have about 3/4-1" hanging below the board. You should have about 1/2" extra on either side. Just wrap it around the foam core to the back side. Run your finger along the lace to smooth out any glue poking through the holes. Using another piece of plastic wrap cover your glued lace and put a couple books on top to weigh it down. Let it dry completely. You glue will dry clear. Remove books and plastic.


I cut two pieces of wood from the doweling I purchased at the craft store. Each piece was cut to 13". With a brad nailer or staple gun (this may be too thick for a staple gun- I didn't try it) attach the wood to the ends inside your crown. This will give your crown a nice rounded front.


Yup, I kinda missed. There was no easy way to pull it out without damaging something and so I left it.


The entire thing got a good coating of gold spray paint.


If you are putting this above a bed secure it to the wall with 'L' brackets. It could probably be secured with 3M pieces. Mine was a temporary installment so I didn't need to do anything drastic.  


These photos were taken with my phone. I forgot my camera that night!


And there you have it. Let me know if you try this project! 
Thanks for stopping by.


Partying on the blogs;
The Boondocks Blog, French Country Cottage, The Cottage Market, DIY Vintage Chic, Creatively Homemade, Life With Lorelai, The Charm of Home, The Pin Junkie, Pieced Pastimes, One More Time Events, Finding Silver Pennies, Nifty Thrifty Things, Create With Joy, Re Do It Yourself, Ducks n'a row, DIY Showoff, The Stonybrook House, Dwellings-The Heart of Your Home, I Should Be Mopping The Floor, Skip To My Lou, Plucky's Second Thought, Strangers and Pilgrims on Earth, Coastal Charm, Mad In Crafts, Cedar Hill Farmhouse, Celebrate and Decorate, Cupcakes and Crinoline, Home Stories A to Z, Lou Lou Girls, A Stroll Thru Life, Our Home Away From Home, April J Harris-Hearth and Soul, The Crafty Blog Stalker, Ducks n'a Row, The DIY Dreamer, Savvy Southern Style, My Repurposed Life, Gingersnap Crafts, DIY By Design, The Newlywed Pilgrimage, Katherine's Corner, The Vintage Nest, Joyful Homemaking, Have A Daily Cup of Mrs. Olson, Imparting Grace, Up To Date Interiors, The Pin Junkie, The Charm of Home

Thursday, February 2, 2017

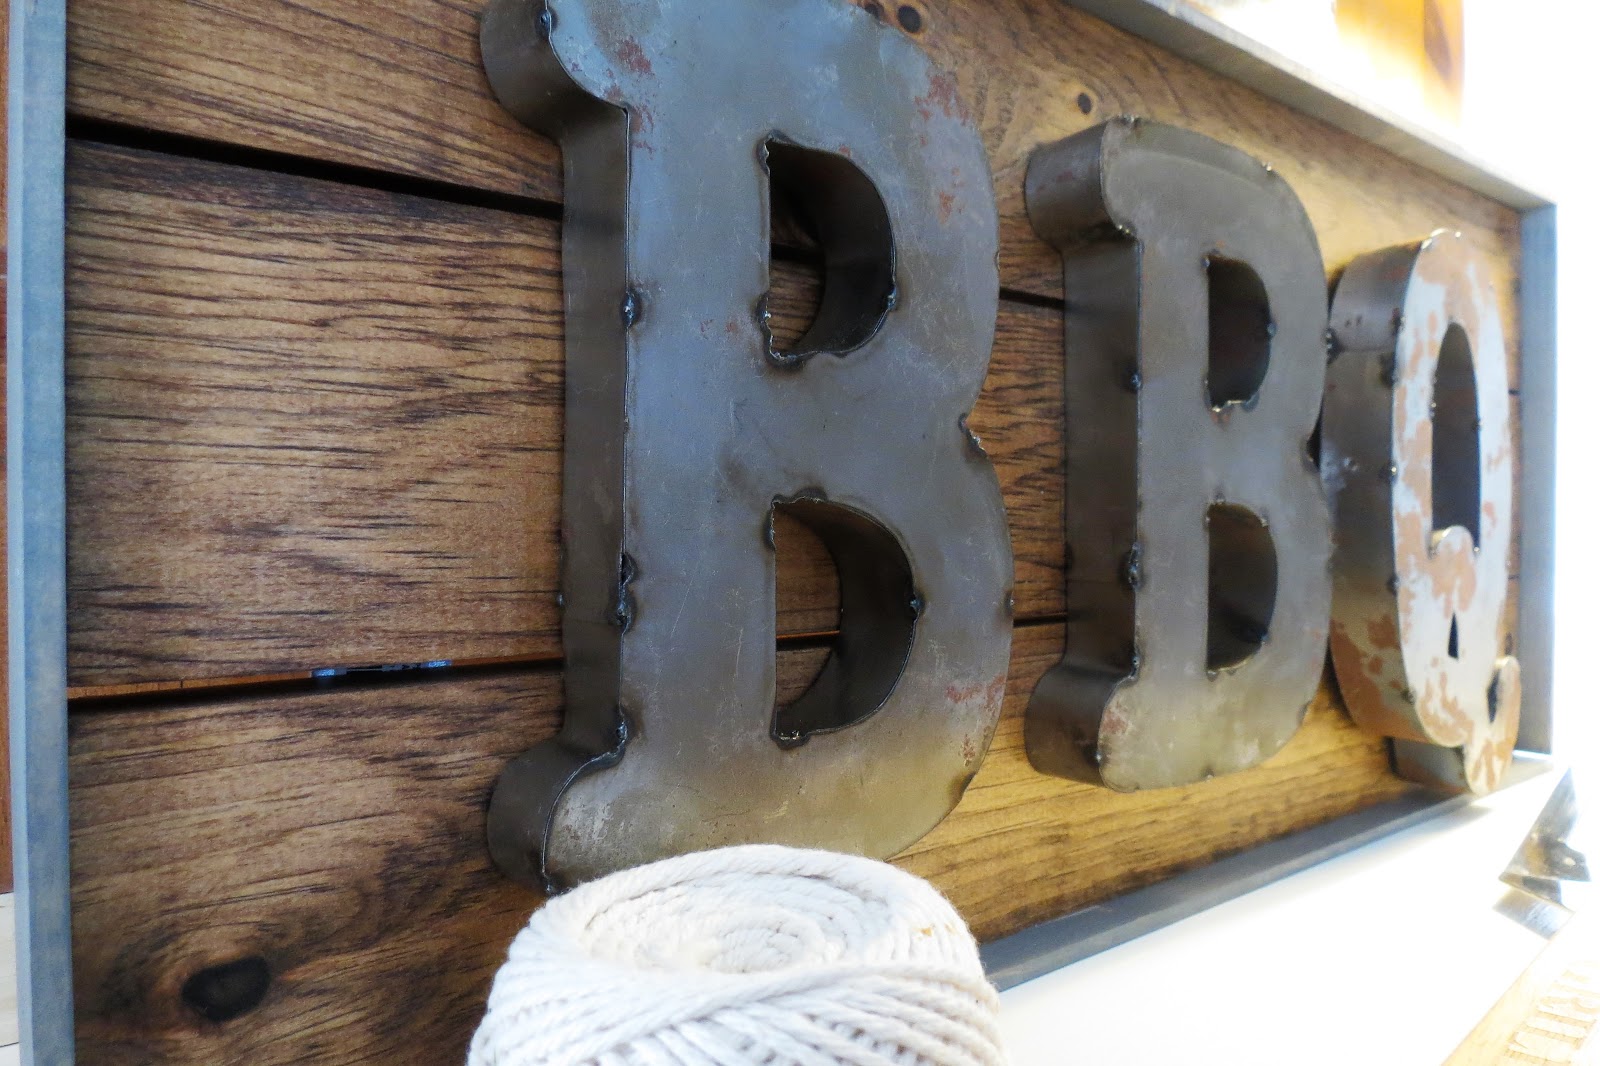
BBQ Sign Tutorial

On a trip to vintage and antiques fair last summer Mister picked up some tin letters and commented that we should make a sign for his barbecue area in the back yard. Hmm....I picked up two B's and a Q, with no specific plan-but, really, when has that stopped me?


Many weeks (or months) later inspiration struck and off I went to the hardware store. I bought one piece of 1x4 (which is actually 1 x 3.5). I bought an 8 foot length and cut three 24" lengths. Why not purchase a 6 foot length, you ask? You want to make sure to cut the end off so you have a nice, square end. Then, cut your lengths.


Apply a coat of stain making sure to get all the sides and ends. When the stain has dried turn the pieces face down. I used paint sticks for spacers and laid the three pieces next to each other.


The pieces were secured in that configuration using mending plates and screws. Make sure you are using short screws, less than the width of you wood, so that you do not go through the front of your piece.


I laid the metal letters on the wood and here is where I kinda thought uh-oh. There were no hangers on the backs of the letters.


How was I going to keep them on the wood?  I cut six small pieces of wood about 3/4 x 1 1/2". I traced the letters onto the wood for points of reference.


Then, just inside the trace marks I secured the small wood blocks where the flat part of each letter would rest against it. Since these are such small pieces of wood you want to pre-drill a hole in each first then screw them in, otherwise they will split.


My thought was that I could use the brad nailer to secure each letter on the blocks! Genius, right? Umm... no. The brad nailer could not pierce the metal. Now what? Super glue! I tried super glue for metal and wood. I walked away from the project for a few weeks during the Christmas season.

During that time I decided it needed a frame of some sort. I purchased a piece of flat trim from my local home store for a few dollars. None of my photos came out for this step! Sorry.  I cut pieces for the top, bottom and sides. All four pieces were stained Weathered Gray by Verthane. I used the brad nailer to attach them. While doing this step the letters started falling off! The glue was not holding! Gah!

New plan. I drilled holes in the metal letters where they met the wood blocks, being careful to avoid the screws that held each block in place. ( A word to the wise here, metal shards from drilling can be extremely sharp and go in like splinters only FAR worse! Keep sticky tape near by to clean off the drill bit and pick up the metal bits.)


I set the letters in place and drilled back through the hole with a very small bit into the wood block- again trying to avoid splitting. Don't go too deep; you want the nail to catch something.  I secured each letter, top and bottom to the wood blocks with a nail. It took a little finessing and a nail set as the trim work was in the way of getting a clean shot.


I did apply a coat of poly on the outside trim but left the inside wood with just the stain. I have not put hangers on the back yet as we are not sure where it will hang exactly so when we figure it out we will adjust accordingly.

Here is the finished product. I can't wait for warmer weather so we can take it outside and hang it!


Linking up to these parties!
French Country Cottage, The Cottage Market, The DIY Village. DIY Vintage Chic, Creatively Homemade, Life With Lorelai, The Pin Junkie, The Charm of Home, Chic On A Shoestring, Ms.Toody Goo Shoes, The Boondocks Blog, Pieced Pastimes, One More Time Events. The DIY Showoff, Finding Silver Pennies, Nifty Thrifty Things, Create With Joy, I Should Be Mopping The Floor, Skip To My Lou, Strangers and Pilgrims On Earth, Coastal Charm, Cedar Hill Farmhouse, Our Home Away From Home, Flamingo Toes, Cupcakes and Crinoline, Creatively Living, Plucky's Second Thought, Lou Lou Girls, Celebrate and Decorate, A Stroll Thru Life, A Bowl Full of Lemons, The Painted Hinge, Savvy Southern Style, The Newlywed Pilgrimage, Gingersnap Crafts, DIY By Design, Ducks n'a Row, My Repurposed Life, The Vintage Nest, Joyful Homemaking, A Cup of Mrs. Olson, A Delightsome Life, Up To Date Interiors, Charm Bracelet Diva, Olives n Okra, Craftberry bush, Imparting Grace, Home Stories A to Z, Mad In Crafts, The Crafty Blog Stalker
Friday, December 30, 2016

2016 Round-up and Review

2016 was a fun year for me full of changes and new adventures. The year started off rather slow. After Christmas and a brief break from the blog I struggled with what to jump back into blogging about, which project to tackle, do I have time, do I have anything to say.... blah, blah, blah.

Visits to the blog were as slow as my postings.  I watched the numbers of visitors trickle in. Then bam! My numbers started going crazy. I didn't know why. I could see that people were looking a post from 2015 but didn't know why the attention.

I did a few small projects like the Craigslist night stand and mirror.


We finished the room switch upstairs with the completion of the office/music room.


 Easter came and went. Then Mister called me one day in April and said something like "Did you know your blog was on Huffington Post?" What?? Wait...WHAT??? He sent me the link and there was my daughter's bedroom. Crazy, right? Turns out HP doesn't tell you when they use your work on an post; no warning, no collaborating, just boom~!

So, here are the top three posts visited this year.

#1)  Bedroom #2-Reveal (actually a 12/2015 post but it took off in 2016)


#2) A Craigslist Hutch Tutorial


#3) My Summer Kitchen


Top 3 posts according to Hometalk

#1) Old Girl-New Gig, Part 3- Bathroom Makeover Completed

This was the first "job" I've ever done for someone other than myself! (And, yes, I should have ironed that shower curtain!)


#2) Evolution Of A Gallery Wall


#3) DIY Art With A Sharpie


Top 3 posts according to me (my favorites).

#1) Stay Close


#2) Dreams, Fears, Miss Mustard Seed and Me


#3) Counter Chairs

Why this one? I LOVED the fabric on these chairs, number one. Number two, I dream of someday having a beach cottage and these chairs are what I envision in my beach home. Number 3, they are fun and a big change from how they started with little money and a little work.


There you have it; a year of writing and painting and fixing and making things around my home. I wonder what the new year will bring and what I can get into. A friend stopped over recently with her sons for a Christmas visit. They were amazed that nothing had been painted recently. I reassured them that there plans in the works for a couple of rooms to get a fresh coat of new color.

Just thinking about it now makes me want to get started but first I have to put away the Christmas decor. Ugh! I don't like that part but I do like the feeling of space when everything is put away.  And, school is back in full swing next week so I had better get busy!

Happy New Year to you, friend and thanks for the visits throughout the year!